Yea...new template!

As you can see, I have finally managed to change to a new template with some tweaking here and there. Took me almost 2 days solid to scour the net and filter through among the hundreds of templates available. I thought there were nicer templates than this one but I can't seem to make them work like I want them to.


The old template was nice but after I'd upgraded my browser to the latest ones, the sidebars and widgets just went bonkers on me. Hope you guys like this one!

Ciao!

Pusing Gunung Jerai

Sejak hari Rabu, 26hb Mei lagi bebudak tu duk hantar e-mail nak set hujung minggu ni nak pi pusing Gunung Jerai. Hari Jumaat, 28hb Mei dapat cuti coz Hari Wesak. So, kami ada 3 hari cuti. Aku suggest hari Sabtu coz Ahad boleh recover sebelum pi kerja balik. Tapi, AP bagitau kata AK nak ajak kayuh pagi Jumaat. Katanya nak light training sebelum pi Ipoh Jamboree Ahad ni.


Pikir punya pikir, since aku pun plan nak naik Gunung Jerai hari Ahad ni.....so wth...aku ikut AP dan AK set hari Jumaat pagi. AK dan aku memang duk satu taman (lebih kurang la). So, aku set jumpa dia kat simpang taman jam 7. Memang standard la budaya orang Jepun, aku sampai terpacak jam 7 pagi, AK dah ada kat simpang warming up buat 'donut' (pusing-pusing la tu).

So, kami kayuh dari taman kami pi ke kaki Gunung Jerai. On the way, kami rendezvous ngan AP. Sampai kat kaki Gunung Jerai, R dah ada kat situ. Dia bagitau, bebudak lain set esok.

Haa..tu dia, dari kiri aku, R dan AK masa kami duk borak-borak ngan geng lain kat parking lot tu. Pastu, kami start kayuh ikut jalan nak pi Titi Hayun. Jalan tu kira mini-tar kampung la. Lalu kot tepi rumah, dusun, ban, kubur Cina dsbgnya. Sepanjang jalan memang redup coz banyak pokok. Kekadang ada jugak naik turun, so kena be prepared nak tukar gear ikut sedap rasa. Lagi satu, kena hati-hati sket dengan motosikal yang datang dari arah bertentangan.

Gambar ni aku amik masa refueling stop kami kat pekan Yan. Nak cerita tempat menarik untuk dilawati kat Yan ni, aku pun bukannnya expert sangat tapi kalu nak mandi air terjun bole la kat Titi Hayun dan Batu Hampar. Yang suka melepak tepi pantai tu bole la pi Pantai Murni. Tapi mungkin kureng sesuai untuk mandi-manda coz berselut sket.

Lepas refuel stop, kami start kayuh pi Tanjung Jaga. Biasala, aku first time ikut otai-otai ni, takder masa nak enjoy the view...concentrate tak mau kena tinggai. Anyway, dia punya view memang cantik terutama jalan susur pantai. Orang-orang kat sini kira ada juga yang buat banglo besar-besar...cantek siut. Sorry, tak sempat ambik gambar. Maybe next time bila aku kayuh sorang-sorang. Tup-tup AP bagitau dah nak sampai bukit...hmm...tengok macam bole tahan gak. Anyway, try jelah. Lepas bukit yang first tu, AP stop sat bagi aku amik gambar.

Dari kiri AP, R dan AK.


Gambar ni aku terpaksa Photoshop sket bagi memanjang coz lepas aku tengok without modification nampak kaki pendek siut. Lepas ni kami continue kayuh sampai pekan Merbok, Tupah, UiTM dan AIMST. Aku try ikut AK. AP dan R ada kat belakang sket. Depa bagi chan kat aku.

Sebelum sampai UiTM, aku plak pi depan. Since aku familiar ngan kawasan ni, aku up sikit kami punya cruising speed. AP dan AK rilek jer kat belakang, aku dah separuh KO. Tapi tak per coz sampai pekan Bedong, rumah aku dah dekat. AP dan R kena kayuh lagi.
Ni, gambar yang aku amik masa kami tunggu R di pekan Bedong. Lepas, R sampai, kami borak sket then say bye-bye. AP dan R terus kayuh ke Gurun. Aku dan AK kayuh balik taman kami. Aku wish good luck kat AK untuk Ipoh Jamboree Ahad ni.


Kesimpulannya selepas aku first time pusing Gunung Jerai ni....memang syok. Sekali lagi, aku nak ambil masa sket buat kayuhan santai, baru bole amik gambar lebih sket. Jarak kayuhan keseluruhan adalah lebih kurang 65km. Average speed 23~25km/hr. Top speed lebih 40km/hr. Masa kayuhan 2 jam 25 minit.

Tinggi tempat duduk yang betul

Bagaimana menentukan ketinggian tempat duduk yang betul.

Jika anda menyangkakan bahawa menentukan ketinggian tempat duduk adalah sesuatu yang begitu asas dan semua pakar adalah sependapat tentang cara menentukannya, anda ternyata salah.

Namun semua pakar berpendapat bahawa jika ketinggian tempat duduk anda adalah salah, akibatnya adalah suatu bencana. Kajian terkini menunjukkan bahawa, tempat duduk yang terlalu rendah boleh mempercepatkan masa anda mencapai keletihan mutlak (exhaustion) sebanyak 12 peratus.

Oleh itu, biasanya bagi penunggang yang kesuntukan masa untuk latihan, mereka akan sengaja melaraskan tempat duduk lebih rendah dari paras optima bagi membuatkan kayuhan mereka lebih mencabar.

Teori di atas adalah menarik, namun untuk anda sengaja melaraskan tempat duduk ke tahap bawah optima adalah perlu untuk anda mengetahui di manakah sebenarnya kedudukan tempat duduk yang optima itu sendiri.

Teruskan membaca untuk mengetahui cara yang betul melakukannya.

1. Kaedah tumit

Kaedah ini merupakan kaedah yang selalu digunapakai oleh kebanyakan mekanik kedai basikal atau pembantu jimnasium sebaik saja anda melangkah duduk di atas basikal. Letakkan tumit kasut anda di pedal dan laraskan tempat duduk supaya kaki anda lurus semasa kedudukan pedal paling bawah dengan keadaan tulang pinggul anda dalam keadaan mendatar (pinggul kiri dan kanan adalah sebaris).

Walaupun kaedah ini biasa kita dengar, namun tiada bukti saintifik yang menyokongnya dan kaedah ini kerap akan mengakibatkan tempat duduk berada pada paras yang masih agak rendah dari yang sepatutnya.

Profesor Will Pelever dari Universiti Wanita Mississippi yang pernah menulis beberapa kertas putih membandingkan kaedah menentukan tahap ketinggian tempat duduk berkata, "Masalah utama kaedah ini ialah, ianya tidak mengambil kira perbezaan individu dari segi panjang tulang paha, betis dan kaki keseluruhannya".

2. Kaedah 109%

Kaedah yang lebih tepat telah dibangunkan oleh Hamley & Thomas dalam sebuah kertas yang dibentangkan pada 1967. Mereka telah menjalankan ujikaji dengan berbagai ketinggian tempat duduk dan mendapati bahawa tahap ketinggian paling sesuai dapat dicapai jika tempat duduk berada pada posisi 109% panjang kelakang (inseam) apabila diukur dari paksi tegak pedal ke atas tempat duduk.

Pada dasarnya panjang kelakang anda adalah jarak di antara lantai ke titik paling atas celah kangkang anda dalam keadaan anda berdiri tegak. Bagi mendapatkan ukurannya, berdiri menghadap dinding sambil mengepit senaskah buku yang tebal diantara celah kangkang anda seakan tempat duduk basikal. Sambil memastikan anda berdiri tegak dengan tumit anda rapat ke lantai, tandakan garisan di dinding di mana garisan atas buku itu menyentuh dinding.

Jarak dari lantai ke garisan yang ditandakan itu adalah panjang kelakang anda. Adalah lebih baik jika anda mengambil ukuran beberapa kali dan dapatkan nilai purata bagi mendapatkan bacaan yang paling seragam.

Kaedah ini terbukti sangat popular dan disarankan oleh ramai jurulatih peringkat tertinggi. Namun kajian terkini oleh Profesor Pelever mendapati bahawa kaedah ini adalah kurang baik berbanding dengan kaedah Holmes (sila lihat di bawah) dari segi penghasilan kuasa dan pengunaan tenaga yang ekonomi.

3. Kaedah LeMond

Ini adalah variasi popular daripada kaedah 109% yang dirintis oleh juara 3 kali Tour De France, Greg LeMond.

Dengan menggunakan nilai 88.3% panjang kelakang sebagai ukuran, tempat duduk dilaraskan supaya agar jarak di antara titik tengah bottom bracket ke atas tempat duduk adalah sama dengan 88.3% panjang kelakang anda.

Pelever juga mendapati kaedah LeMond akan menghasilkan keputusan yang berbeza dengan kaedah 109%. Walaupun kaedah ini sesuai dengan kebanyakan penunggang, namun ianya kurang sesuai untuk penunggang yang mempunyai tulang peha yang panjang.

4. Kaedah Holmes
Kaedah ini pada asalnya dibangunkan bagi mengurangkan kecederaan akibat terlebih gunapakai (over-use) dan mengambil haluan yang berbeza berbanding dengan 3 kaedah yang di atas.

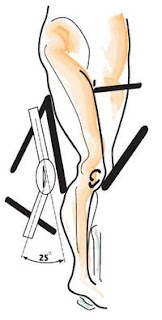
Ianya menggunakan alat yang dipanggil goniometer bagi mengukur sudut di antara tulang betis dan tulang peha (berpangsikan pada sendi lutut) pada kedudukan pedal paling bawah. Holmes menyarankan nilai sudut di antara 25~35 darjah atau lebih dekat dengan 25 darjah bagi mereka yang mempunyai sejarah penyakit patella tendonitis.

Jika semua ini agak terlalu teknikal untuk anda, adalah lebih baik jika anda menggunakan 3 kaedah yang sebelum ini. Sebaliknya, anda bolehlah membeli goniometer ini dari mana-mana gedung pembekal alatan perubatan yang besar.

Kajian Pelever menunjukkan bahawa kaedah melaraskan tempat duduk anda berdasarkan kedudukan sudut tulang betis 25 darjah adalah lebih berkesan berbanding dengan kaedah lain. "Menggunakan goniometer dan sudut 25 darjah adalah kaedah yang saya sarankan" katanya.

Jangan terlalu bergantung kepada tahap keselesaan semata-mata. "Jika anda sudah biasa mengayuh dengan keadaan tempat duduk di bawah paras optima, anda mungkin akan berasa janggal pada peringkat permulaan menggunakan kaedah 25 darjah ini" kata Pelever.

"Namun, setelah badan anda mula serasi (selalunya dalam 2 hingga 3 minggu) , posisi baru ini bukan sahaja akan lebih selesa, ia juga akan membawa kepada peningkatan dari segi prestasi untuk jangka masa panjang."

Jika anda masih berasa kurang selesa setelah beberapa minggu, anda perlulah membuat pelarasan yang sepatutnya. Adalah lebih baik jika kaedah 25 darjah digunakan sebagai titik permulaan. Minta bantuan rakan anda untuk memerhatikan dari belakang bagi memastikan bahawa kedudukan tulang pinggul anda stabil (tiada pergerakan naik turun, ke hadapan atau belakang yang keterlaluan akibat daripada jangkauan yang keterlaluan semasa kedudukan pedal paling bawah). Jika ini berlaku, sudut ini perlu ditambah sedikit nilainya bagi meningkatkan keselesaan.

"Setelah selesai membuat penyesuaian bagi seseorang penunggang itu dengan basikalnya, selalunya sudut tulang betis mereka adalah di antara 25 hingga 30 darjah, tetapi lebih kerap pada 25 darjah setiap kali." kata Pelever.

Artikel asal : Nick Morgan
Terjemahan : Wan
Disclaimer : Penterjemah tidak akan bertanggungjawab jika sekiranya berlaku sebarang kecederaan, kemalangan dan sebagainya akibat dari aplikasi kaedah yang disebutkan di atas.

Tips for beginners

found this article from a site down under done by bicycle victoria. might be useful for beginners.

Cycling is a great form of exercise, and it’s fun. There are lots of health benefits associated with regular cycling. Your cardiovascular fitness will improve and this means you’ll lower your risk of heart attack and stroke. Pedalling is low impact, so you can improve muscle tone without stressing your knee and ankle joints.

The bicycle
Suggestions include:

  • Make sure your bicycle is appropriate for your height and needs. Ask staff at bike shops for help when choosing a new bicycle.
  • Have your bicycle professionally serviced once every year.
  • Regularly check your bike yourself, perhaps once a week, to make sure it is in good repair. Check the tyres, bearings, gears, nuts and bolts, and lubricate the chain and cables. If you’re not sure how to do this, consult with staff at bicycle stores or bicycle repair shops.
  • Adjust your saddle for your leg length. Your knee should be only slightly bent when your foot is on the pedal with your leg fully extended. You risk knee strain if your knees are too bent.
  • Your handlebars should be positioned about five centimetres lower than your saddle height.
  • Narrow seats may be uncomfortable, particularly for women. Opt for a wider saddle or a gel-filled saddle. You could also pad the seat with a sheepskin cover or similar.

The helmet
Suggestions include:

  • Always wear a helmet. Research suggests that wearing a helmet reduces the risk of head injury by up to 60 per cent.
  • If your helmet hits the road or an object, replace it even if it still looks okay.
  • Look after your helmet. Keep it out of direct sunlight when not in use, and clean it strictly according to the manufacturer’s instructions.

General health and safety suggestions
Suggestions include:

  • Let someone know your intended route and what time you think you’ll be back.
  • Wear sunscreen on skin not covered by clothing.
  • Take a drink with you to reduce the risk of dehydration.
  • Pack identification, money and your mobile phone (if you have one) in case of emergencies.
  • Don’t wear headphones. You need to hear what’s going on around you.
  • Cycling shorts reduce the risk of skin irritation because the material doesn’t bunch and rub against your buttocks.

Road rules
Suggestions include:

  • Treat your bicycle as you would your car, and obey the road rules. Don’t ride on the wrong side of the road or coast through red lights, for example.
  • Flag your intention to turn by hand signalling or using your indicators if your bicycle has them.
  • When turning right, perform a hook turn from the left side of the road.
  • Ride in a predictable way, about one metre out from parked cars.

Visibility on the roads
Suggestions include:

  • Always wear brightly coloured clothing. It is harder for motorists to see you if you are dressed in dark or dull colours.
  • Fluorescent fabrics markedly increase your visibility to other road users.
  • Have lights fitted to your bike, front and back, for night riding.
  • Reflective garments, including reflectors fitted to the back of your shoes, can increase your visibility at night.

Riding tactics
Suggestions include:

  • Altering your riding position from time to time reduces the risk of muscle overuse, stiffness and soreness.
  • Pedalling in high gear for a long time will stress your knee joints. Switch to lower gears whenever you can.
  • Maintain the same cycling rhythm when going uphill by changing gears.
  • Once you’ve crested the hill, avoid the temptation to coast down the other side. Pedal a little bit to reduce the risk of lactic acid build-up in your leg muscles.
  • Avoid using your brakes continuously when riding down a long hill, because you may overheat your brakes and consequently your tyres. Hot tyres are more likely to burst. Instead, apply the brakes gently and intermittently.
  • Ride defensively. Don’t assume that car drivers have seen you. Make eye contact with car drivers when negotiating turns or intersections.

Things to remember

  • Wearing a helmet reduces the risk of head injury by up to 60 per cent.
  • Treat your bicycle as you would your car, and obey the road rules.
  • Boost your visibility on the roads by always wearing brightly coloured clothing, and by fitting your bicycle with lights for night riding.

ciao!

What to eat before, during and after your ride

By : Jennifer Eblin, Jan 21st 2008

Did you know the way that you eat can influence your cycling performance? Certain foods can make you feel your best, while other foods may slow you down. Eating the right foods not only can help your performance but also give you more energy and help fight any muscle fatigue you may be feeling. If you've noticed yourself feeling a little tired on your rides lately, then try a few of these simple tips.

Let's start by looking at things you can do before your ride to make your cycling its best. You should try to avoid heavy foods. Imagine riding down the road while holding a concrete block on your stomach. Does that sound like fun? Of course not, but if you eat heavier foods, this is exactly how you will feel on your cycling trip. Instead you need to look for low fat foods that are high in complex carbohydrates and proteins. Low sugar cereals mixed with fresh fruit and skim milk is a good option. You can also try an energy bar, a peeled banana, or a handful of nuts. You should also avoid caffeine drinks prior to cycling. Caffeine not only dries out the body, but also works as a natural diuretic. Instead of caffeine or overpriced energy drinks, try drinking water. H2O evenly hydrates the body without adding any unnatural elements into the body.

You can also watch what you eat during your bike ride. Obviously a trip around the block probably won't require snacks, but in longer cycling trips, snacks become necessary. The problem is that many riders focus on quick fix solutions during their ride. They grab the nearest candy bar or bag of chips, which is a mistake. High sugar foods make a rider feel satisfied, and may provide some energy, but those empty calories will burn off before you know it. Instead pack a few things that you can carry with you and are easy to eat on the go. While cycling you are going to need a snack at least every half-hour. Try an energy bar, a piece of fruit, or a small peanut butter sandwich. Remember that you'll need to keep drinking water during your ride too.

Don't think that once you're done with your bike ride that you can neglect proper nutrition. The first few hours after cycling are just as important as anything you do before, or after your ride. Your body may feel dehydrated and weak, and you will need to replace any lost nutrients. One easy way to do this is to consume a meal reach in protein. Hard boiled eggs, grilled chicken, and low fat beef are all good options. If you're in a hurry, or on the run try drinking a quick protein shake. You'll find the same nutrients in a convenient size.

Try using some of these tips the next time you plan on cycling, and you'll be amazed at the results.


Super drink

By : Kate Hodgins, Cycling Plus, 12th April 2010

“Our studies looked at the potential application of milk to the sports performer, with particular emphasis on endurance performance and recovery from strenuous exercise,” said sports nutritionist Dr Phil Watson from Loughborough University.

“The most striking outcome was the effectiveness of milk to restore fluid losses following exercise. This suggests that milk is indeed an ideal post-exercise recovery fluid, effectively replacing sweat losses incurred during exercise and replenishing the body’s carbohydrate stores.”

Topping up with carbohydrate directly after exercise is essential and ideally you should also aim to down some protein as this helps repair damaged muscle. As milk contains both it’s a good option post ride.

Although both low fat and whole milk provide the same electrolytes and minerals, low fat milk is often more palatable and thirst quenching. Also, the fat content of whole milk is more likely to lead to uncomfortable feelings of fullness (even for those who aren’t lactose intolerant).

“The more energy-dense a solution, the more slowly it empties from the stomach,” says Dr Watson, “so skimmed milk is seen as less likely than whole milk to cause symptoms of gastrointestinal distress or bloating.”

Stuart Phillips, from the Exercise Metabolism Research Group at McMaster University in Ontario, Canada, also conducted research into milk consumption after resistance exercise, finding that drinking milk after exercise promotes better fluid retention than a traditional eight percent isotonic sports drink.

“Milk contains the protein that seems to suit muscle repair best. Its unique blend of casein and whey contain amino acids in a pattern similar to muscle protein,” says Phillips. “It also has other essential minerals and nutrients that our bodies need, so it’s a convenient package of nutrients and good for you.”

What's in it for us?

100ml of skimmed milk contains:

  • 35kcal energy: Measured in calories, it’s an essential aspect of being able to exercise.
  • 1.7g protein: Helps the body to repair and strengthen muscles.
  • 4.5g carbohydrate: Needed for energy; the more you ride, the more you need. Carbohydrate is stored in the liver and muscles as glycogen.
  • 0.3g fat: Supplies some vitamins and essential fatty acids (EFAs). Too much can lead to clogging arteries and obesity.
  • 22.5% RDA riboflavin: Helps maintain healthy membranes in your skin, eyes and nervous system. It also helps produce steroids and red blood cells.
  • 20% RDA vitamin B12: Helps release energy from our food, make red blood cells and keep the nervous system healthy.
  • 5% RDA vitamin C: Required for the growth and repair of tissues.
  • 17.5% RDA calcium: Has been shown to decrease the accumulation of body fat and hasten weight loss during energy restriction.

Any alternatives?

Unfortunately, if you're lactose intolerant, dairy milk won’t agree with you and the soy milk you might drink instead doesn’t seem to be quite as good. “Soy drinks that try to mimic milk do nowhere near as well as milk because the protein is entirely different and the nutrients are simply thrown together to create a drink,” says Stuart Phillips of McMaster University. “Our data shows that soy protein is inferior to milk in promoting muscle accretion and muscle protein synthesis.”

But if it’s just the taste of milk you don’t like, then there’s good news, because a study last year claimed that chocolate flavoured milk is even better for you! The study, carried out on 13 university football players, found that players who had been drinking chocolate milk had lower levels of the chemical creatine kinase, which is a sign of muscle breakdown.

The best MTB climb in Kedah, Malaysia - Gunung Jerai

This is Gunung Jerai viewed from the Perwaja Caltex petrol station. Well actually, this shot was taken after my Sunday morning Jerai ride. I was supposed to take this shot on my way to the ride but my kid stole the battery off my digital camera for his remote controlled car.....arrrrgh!

Anyways, stuffed my bike into my trusty old Citroen and left my house at about 7:30 am after I've sent my kids to school. Drove past Perwaja Steel and stopped by the Gurun 7 Eleven convenience store to get some Gatorade, mineral water, Tiger Biskuat biscuits & Marigold Blueberry yogurt and of course some new batteries for my digital camera.

Got to kaki Gunung Jerai at just after 8 am and started gobbling the biscuits and then I toppped them up with the yogurt and some Gatorade. RB and SZ were already there together with PY, F and Cikgu. Got my rig out and while I was prepping, the others were already giving signs that they would like to start first. I said they should go on ahead without me first as I need to take some more shots of the Gunung Jerai sign board (off course with my rig in front of it).

There were also some guys from Penang, Bukit Mertajam and Kepala Batas. Of late, I have noticed that more and more people are coming to Gunung Jerai for their Sunday rides which is fine by me. The more the merrier right?

Just a reminder before you guys start your climb. Make sure you empty your bladder (small water) and also get rid of the 'big water' (a.k.a solid waste) prior to your ride up because the next loo stop is going to be at the Forestry Museum about 10 km ride. I wouldn't recommend the public toilet (at least not for the solid waste thingy) near the parking lot though.

Nuff said...it's time to staaart your engines folks! From the parking lot there are actually two ways you can go up Jerai. The first path is actually just beside the public toilet, next to the small kindergarden. I would recommend the other route which is just behind some small eateries at the end of the parking lot. You will have to ride pass a playground on your left. Then, it's just one way up. The first 1 or 2 kilometres up, you will see some moderate gradient slopes mixed with almost flat sections. There will also be some folks doing their early morning walks/runs. You will also pass some durian orchards and a karaoke cafe on your right. From there on, there is not going to be much flat sections anymore. After about 3 kilometres of warming up, you will come to the so called Post 1. Usually there will be a few people with their 'kapchais' parked there having smokes and reading newspapers or some couples 'strutting' their stuff.
At the 5th kilometre, you will come to the next pondok called by us Post 2. Most of the newbies will usually take a drink breather here. Luckily you wont see any couples stoping here to do their stuff. Here, I managed to catch up with the guys who went up earlier.
Coming down, taking the corner here is a bit tricky because of the loose sand on the tarmac. I found out the hard way about two weeks ago and I am still nursing a very sore wrist. Hit my head quite hard on the tarmac. Luckily I had my helmet on. So, I am much smarter now.

The guy in the Subaru jersey is moi. Red jersey is AP and the guy standing next to me is RB.


Another 2 km on, you'll see Post 3. Here, next to RB is SZ, the man with more than 2 kidneys. Something weird happened to RB as we were just about to leave Post 3 to Post 4. He claimed that his bike suddenly got heavier. SZ and me were scratching our heads...hmmm...then RB asked SZ to ride his bike, you know, just to be sure, but according to SZ the bike seemed okay to him.

I don't know why but, the climb from Post 3 to 4 seems to be the toughest for me. When we got to Post 4, AP and Cikgu were already there. We talked about old folks tale saying that Gunung Jerai being the playground for the orang bunians. I am probably among the lucky ones that have not encountered any of them yet. While catching our breath here, there were a couple of riders who went by us and continued to the museum. Not wanting to be beaten by them, we decided to push on. I was in front doing about 6km/hr (which is almost my top speed going up Gunung Jerai) and the guys were following at the back. Somehow without realizing it, after about 5 minutes, I was riding all alone. So, I continued until I reached the Forestry Museum at the 10th kilometre.

The dark brown structure is the museum and is open to the public. Only during school holidays that you can see many people visiting the museum. I managed to reach this stop after my fourth try. So, usually this stop would be sort of the minimum target to achieve for anyone going up Gunung Jerai.


That's the loo I was talking about earlier.


Did I tell you guys bout my new pair of shoes? Got them the day before at Central Square SP. Thought the guy was selling them cheap at RM60 something but turns out that it was actually RM80 something.....sigh! Anyway, it's a nice change from my badminton shoes...he he.


Yep! From the loo, it is 70kms to Butterworth and 43kms to Alor Star.


That's Post 5 which is about 1 km after the museum. After the museum, the ride is not as tough as before. You tend to see families of monkeys foraging for scraps of food by the road side. This is probably due to the leftovers from the people who sometimes set up camps here. Be mindful of the monkeys on your way down yea... From here on it's less than a kilometre to the resort. Upon seeing a large billboard welcoming you to Gunung Jerai, you should take the right route to go to the resort.

I know, I know! You guys are going to say like "What? That's it? This is what I'am busting my b#@*ls for?", but believe me guys, it's really worth the pain. Words just can't do justice to the experience you are going to get climbing Gunung Jerai. Anyway, the photo shows the entrance to the Jerai Regency Resort. Previously, the security guard usually allows cyclists to go into the resort compound but due to some unruly behaviour by a few cyclists, the resort management people decided not to let cyclist and motorcyclist to go into their compound on their ride. You can however, park your rigs at the resort entrance and have a leisurely walk around the compound. The air is fresh and temperature is cool.

As you can see here, we are at 1200 m above sea level. Feels good. The handsome guy standing next to me is Mr. F, a strong climber and friendly chap. We chatted a bit near the resort entrance while waiting for RB, SZ and AP.
After a while it was clear that those three guy are not going to make it to the resort anytime soon. So, we decided to head back down.

One last shot of F with his beloved Santa Cruz. On our way down, RB, SZ and AP were nowhere to seen. Found out later that they did not make it to the museum on that day.


After all that has been said and done, to me, Gunung Jerai is the best mtb climbing destination in Kedah. The climb is like a drug. It's addictive. Every climb is different. I can set various personal targets each time. Total climb distance is about 12 to 13 km.

Just a number of tips (not in any particular order) that might prove useful,
1. Whatever happens, always wear your helmet on your way down.
2. Going downhill is always dangerous. Know your limit. Slow down at the corners.
3. Make sure you brakes work.
4. Bring at least 1 to 2 litres of drinking fluid.
5. If you want, you can reduce you tyre pressure and lower your seat when going down.
6. If possible, do not take a heavy breakfast prior to the ride.
7. Always remember, not all cars coming up honk their horns at the corners.
8. Some of the 'crazies' can reach the resort in less than 90 minutes without stopping.
9. Taking short drink breaks and walking around a bit will help prevent cramps and improve blood circulation to portions of your body where the sun doesn't shine.
10. Try not to use the largest rear sprocket and the smallest crank which will cause over-revving.
11. Average climbing speed can vary from 5 to more than 12 km/hr depending on your fitness level.
12. If your aren't scared of dying and have nothing else to live for, you can probably hit more than 70 km/hr on certain stretches(I have not done this yet..he he ) but please read tip #2 again.

How to get there?

From the North-South Highway, take the Gurun exit (after Sungai Petani Utara). After paying the toll, go straight until the T junction, turn left, pass two traffic lights, cross over the railway line and turn right at the next T junction (of course with traffic lights. We Kedahan have a fetish thingy with traffic lights). Drive about 3 km and you should be able to see a small bridge on your left (you'll also notice a surau with a bright n shiny golden dome) and that is the kaki Gunung Jerai parking lot.

If you are lost you can always use Google Map.....enjoy and be safe yea!

greetings!

hello everyone! been thinking about putting up my exploits on my bike for my friends to share. will also give my thoughts on design happenings, auto news, sports, good eating spot, movies, health, self help resources and recent happenings.